Table of Contents
Initial Theme Setup
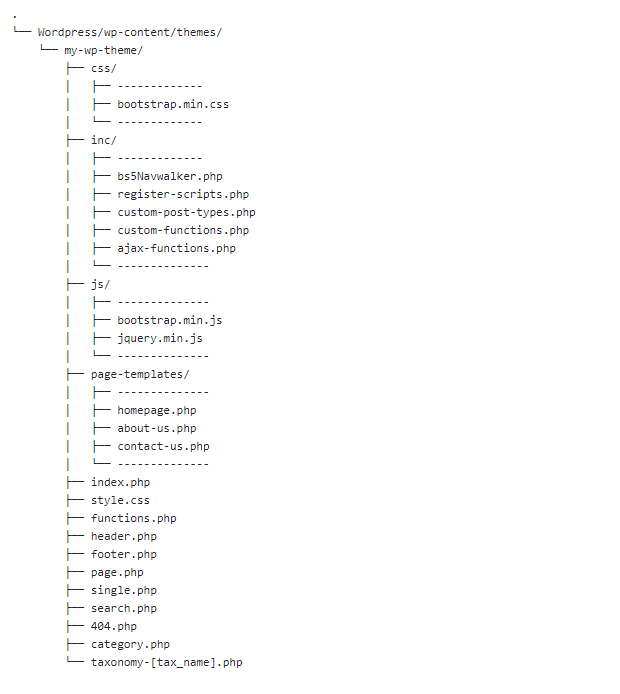
Create a folder mytheme inside the wp-content/themes directory of your WordPress installation.
Download Bootstrap CSS and JS files
Go to the Official website of Bootstrap https://getbootstrap.com and download the compiled CSS and JS files in this folder.
Create the Theme Files
Create the following files required for a WordPress theme –
- Style.css – To Pass Theme details and add styles.
- 404.php – Custom 404 page
- footer.php – Common footer section
- front-page.php – default front page
- functions.php – for all php functions
- header.php – Common header part
- home.php – default home page
- index.php – default page
- page.php – to show single page content.
- single.php – to show single post content.
The Complete WordPress Theme files Structure
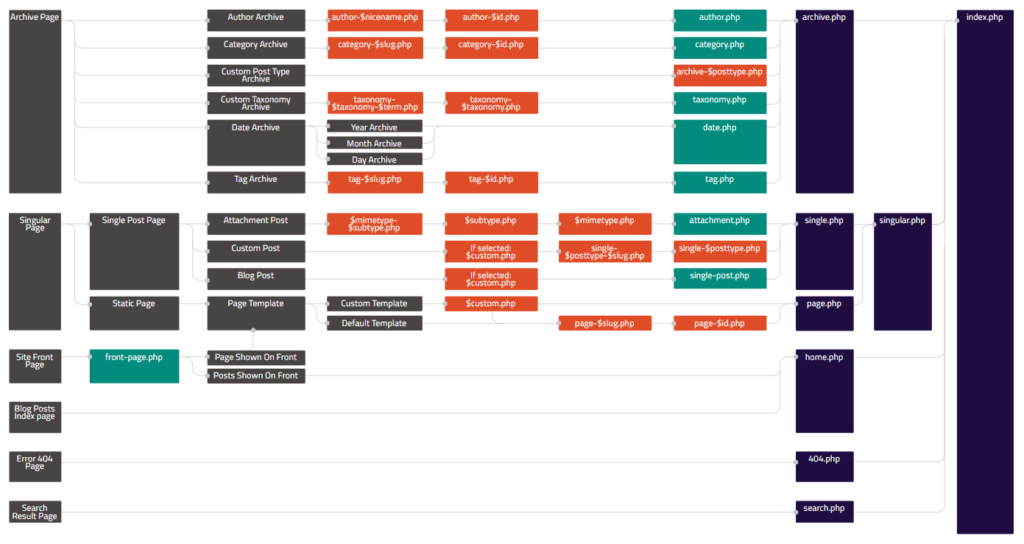
https://wphierarchy.com/
A wordpress theme directory structure looks like this –
#1 Add theme details in style.css
Open the style.css file and add the following code to it.
/*
Theme Name: Bootstrap 5
Author: your name
Author URI: https://wordpress.org/
Description: A Pretty description for your custom theme
Version: 1.2
Requires at least: 5.8
Tested up to: 5.4
Requires PHP: 7.0
License: GNU General Public License v2 or later
License URI: http://www.gnu.org/licenses/gpl-2.0.html
Text Domain: mytheme
This theme, like WordPress, is licensed under the GPL.
Use it to make something cool, have fun, and share what you've learned with others.
*/
#2 Write the Required Functions
#1 Add theme Support
The add_theme_support() function is used to mention what this theme supports.
/* add html5 support */
add_theme_support( 'html5', array( 'comment-list', 'comment-form', 'search-form', 'gallery', 'caption', 'style', 'script' ) );

/* add title tag support */
add_theme_support( 'title-tag' );

/* add custom thumbnail support */
add_theme_support( 'post-thumbnails' );

/* add custom logo support */
add_theme_support( 'custom-logo', array(
    'height'               => 100,
    'width'                => 400,
    'flex-height'          => true,
    'flex-width'           => true,
    'header-text'          => array( 'site-title', 'site-description' ),
    'unlink-homepage-logo' => true,
) );
#2 Function to Display logo in Header
/* Function to display logo in header */
function site_logo()
    {
        $custom_logo_id = get_theme_mod( 'custom_logo' );
        $logo = wp_get_attachment_image_src( $custom_logo_id , 'full' );

        if ( has_custom_logo() ) {
        echo '<a href="'.get_home_url().'" ><img class="custom-logo" src="' . esc_url( $logo[0] ) . '" alt="' . get_bloginfo( 'name' ) . '"></a>';
        } else {
        echo '<a href="'.get_home_url().'" ><h3>' . get_bloginfo('name') . '</h3></a>';
        }
    }
#3 Load CSS and JS files
Unlike static websites, CSS and JS are included using enqueue functions as shown below –
/* load styles and scripts */
function tp_scripts() {
    wp_enqueue_style( 'default', get_stylesheet_uri() );
    wp_enqueue_style( 'bootstrap-min', get_template_directory_uri().'/css/bootstrap.min.css' );
    wp_enqueue_script( 'jquery-local', get_template_directory_uri() . '/js/jquery.min.js', array(), '1.0.0', false );
    // wp_enqueue_script( 'bootstrap-min', get_template_directory_uri() . '/js/bootstrap.min.js', array(), '1.0.0', true );
    wp_enqueue_script( 'bootstrap-bundle', get_template_directory_uri() . '/js/bootstrap.bundle.min.js', array(), '1.0.0', true );
}
add_action( 'wp_enqueue_scripts', 'tp_scripts' );
#4 Customize the Excerpt
The excerpt is a small portion of the post content that is displayed on archive pages.
We can modify the length of the excerpt as required.
/* custom excerpt length */
function tp_custom_excerpt_length( $length ) {
return 20;
}
add_filter( 'excerpt_length', 'tp_custom_excerpt_length', 999 );

/* Custom Excerpt read more text */
function tp_custom_excerpt_more($more) {
    global $post;
    return ' ...';
}
add_filter('excerpt_more', 'tp_custom_excerpt_more');
#3 Create Custom Navigation Menu
The first and most important part of any website is the header menu.
WordPress Developers face a lot of problems while working on custom WordPress themes and making the navigation menu dynamic in WordPress websites.
To display the Bootstrap Nav menu correctly in WordPress, we will use a NavWalker.
Navwalker is a PHP class that extends the functionality of the navigation menu in WordPress.
Click the link below to download Navwalker for Bootstrap 5
https://github.com/AlexWebLab/bootstrap-5-wordpress-navbar-walker
Now copy the code from functions.php and paste it inside the inc/bs5-navwalker.php file
/* include Nav Walker file */
require_once('inc/bs5-navwalker.php');
Create and Save the Menu in WordPress Dashboard

Note – Don’t forget to check the Main Menu Checkbox
#4 Create the Header file
Open the header.php file and add the following code –
<!DOCTYPE html>
<html <?php language_attributes(); ?>>
<head>
    <meta charset="<?php bloginfo( 'charset' ); ?>">
    <meta http-equiv="X-UA-Compatible" content="IE=edge">
    <meta name="viewport" content="width=device-width, initial-scale=1.0">
    <link rel="pingback" href="<?php bloginfo( 'pingback_url' ); ?>">
    <link rel="preconnect" href="https://fonts.googleapis.com">
    <link rel="preconnect" href="https://fonts.gstatic.com" crossorigin>
    <link href="https://fonts.googleapis.com/css2?family=Readex+Pro:wght@600&display=swap" rel="stylesheet">
    <?php wp_head(); ?>
</head>
<body <?php body_class(); ?>>
    <header>
    <nav class="navbar navbar-expand-md navbar-light bg-light">
    <div class="container">
    <?php site_logo(); ?>
        <button class="navbar-toggler" type="button" data-bs-toggle="collapse" data-bs-target="#main-menu" aria-controls="main-menu" aria-expanded="false" aria-label="Toggle navigation">
            <span class="navbar-toggler-icon"></span>
        </button>

        <div class="collapse navbar-collapse" id="main-menu">
            <?php
            wp_nav_menu(array(
                'theme_location' => 'main-menu',
                'container' => false,
                'menu_class' => '',
                'fallback_cb' => '__return_false',
                'items_wrap' => '<ul id="%1$s" class="navbar-nav ms-auto mb-2 mb-md-0 %2$s">%3$s</ul>',
                'depth' => 2,
                'walker' => new bootstrap_5_wp_nav_menu_walker()
            ));
            ?>
        </div>
    </div>
</nav>
    </header>
Note – We’ve used the site_logo() function that we created inside the functions.php file earlier.
#5 Add the Footer Code
Open the footer.php file and add the following code –
<?php wp_footer(); ?>
</body>
</html>
#6 Create the Front Page
Open the front-page.php file and add the following code –
<?php get_header(); ?>
<main>
    <section>
        <div class="container">
            <div class="row">
                <div class="col-md-8">
                <?php
                while(have_posts()): the_post();?>
                <div class="row align-items-center rounded  mb-4 mt-4">
                    <div class="col-md-4">
                    <?php
                        if(has_post_thumbnail()){
                            $thumbnail_url = get_the_post_thumbnail_url();
                        }else{
                            $thumbnail_url = 'https://picsum.photos/300/200/?random=1';
                        }
                    ?>
                <img class="img-fluid rounded archive-thumbnail" src="<?php echo $thumbnail_url; ?>" alt="" >
                    </div>
                    <div class="col-md-8">
                    <div class="p-2">

                <h2 class="h4"><a class="title-permalink" href="<?php the_permalink(); ?>"> <?php echo  get_the_title(); ?></a></h2>
                <p class="mb-2 mt-2 excerpt"><?php echo get_the_excerpt();?></p>
                </div>
                    </div>


                </div>
         <?php
                endwhile;
            ?>
                </div>
                <div class="col-md-4">

                </div>
            </div>

        </div>
    </section>
</main>
<?php get_footer(); ?>
Displaying the Single Post Content
Open the Single.php file and add the following code to it –
/* Code to display Single Post content */
<?php get_header(); ?>
    <main>
        <section>
            <div class="container pt-5 pb-5 d-flex justify-content-center">
            <div class=" flex-column col-md-8 ">
            <img class="img-fluid rounded" src="<?php echo get_the_post_thumbnail_url(); ?>" >
                <h1 class="heading pt-2 pb-2"><?php the_title(); ?></h1>
                <?php the_content(); ?>
            </div>

            </div>
        </section>
    </main>
<?php get_footer(); ?>
Similarly, you can use the same code to display Single Page content, just copy the above code to the page.php file.
Custom Taxonomies
Just like Categories & tags, you can create your custom taxonomies in WordPress.
Custom Taxonomy Archive Template
As the WordPress hierarchy suggests, the file taxonomy-[taxonomy-slug].php will serve as the taxonomy archive page template.
Search Results Template in WordPress theme

Search bar is one of the most obvious feature required in any website. WordPress provides an easy to understand approach to implement search feature.
Creating the Search Form
WordPress has built-in function get_search_form() that print a search form. Just paste the following code wherever you need a search form.
<?php get_search_form( true ); ?>Or You can create your own search form as follows –
<form role="search" method="get" id="searchform" class="searchform" action="<?php echo get_home_url().'/';?>">

  <input type="text" class="form-control" placeholder="I'm Looking for" aria-label="Username" aria-describedby="addon-wrapping" name="s" id="s">

  <button class="btn" >Search</button>

</form>
Displaying the Search Results
Once we’ve shown the search form, we can now start working on search results.
Add the following code in search.php file –
/* Search Results Page(search.php) */
<?php get_header(); ?>

<?php
$s=get_search_query();
$args = array(
                's' =>$s

                /* You can add more parameters here */
            );

$search_query = new WP_Query( $args );
if ( $search_query->have_posts() ) {
        _e("<h2 style='font-weight:bold;color:#000'>Search Results for: ".get_query_var('s')."</h2>");
        while ( $search_query->have_posts() ) {
           $search_query->the_post();
                 ?>
                    <li>
                        <a href="<?php the_permalink(); ?>"><?php the_title(); ?></a>
                    </li>
                 <?php
                 }
               }else{
             ?>
        <h2 style='font-weight:bold;color:#000'>Nothing Found</h2>
        <div class="alert alert-info">
          <p>Sorry, but nothing matched your search criteria. Please try again with some different keywords.</p>
        </div>
<?php } ?>

<?php get_footer(); ?>
Custom Page Templates in WordPress
Custom page templates are readymade templates with specific Layouts & Designs, which you can create in your theme & use them in your website.
How to create custom page templates in WordPress theme
Time needed: 10 minutes
- Create the page-templates folder in your theme directory [wp-content/mytheme/page-templates]
- Create a PHP file with the desired name [elegant-layout.php]
- Insert the required Comment at the very beginning of php code
<?php /* Template Name: My Custom Page */?>
Checkout our Video Tutorial on WordPress theme Development
Some other things required in WordPress theme
#1 Create Custom 404 Page Not Found Template
Create a new file with the name 404.php & add some fancy code you want to display on Urls that are not found
Place your thumbnail image in your theme’s root directory with the name screenshot[screenshot.png or screenshot.jpg] and it will be appear as a thumbnail in wordpress dashboard.
Login to your WordPress dashboard and go to Appearance -> Themes, there you can see your newly added thumbnail will appear on your Custom Theme